
1. docker介绍
1.1 Docker的应用场景
- Web 应用的自动化打包和发布。
- 自动化测试和持续集成、发布。
- 在服务型环境中部署和调整数据库或其他的后台应用。
- 从头编译或者扩展现有的 OpenShift 或 Cloud Foundry 平台来搭建自己的 PaaS 环境。
1.2 Docker 的优点
Docker 是一个用于开发,交付和运行应用程序的开放平台。Docker 使您能够将应用程序与基础架构分开,从而可以快速交付软件。借助 Docker,您可以与管理应用程序相同的方式来管理基础架构。通过利用 Docker 的方法来快速交付,测试和部署代码,您可以大大减少编写代码和在生产环境中运行代码之间的延迟。
1、快速,一致地交付您的应用程序
Docker 允许开发人员使用您提供的应用程序或服务的本地容器在标准化环境中工作,从而简化了开发的生命周期。
容器非常适合持续集成和持续交付(CI / CD)工作流程,请考虑以下示例方案:
- 您的开发人员在本地编写代码,并使用 Docker 容器与同事共享他们的工作。
- 他们使用 Docker 将其应用程序推送到测试环境中,并执行自动或手动测试。
- 当开发人员发现错误时,他们可以在开发环境中对其进行修复,然后将其重新部署到测试环境中,以进行测试和验证。
- 测试完成后,将修补程序推送给生产环境,就像将更新的镜像推送到生产环境一样简单。
2、响应式部署和扩展
Docker 是基于容器的平台,允许高度可移植的工作负载。Docker 容器可以在开发人员的本机上,数据中心的物理或虚拟机上,云服务上或混合环境中运行。
Docker 的可移植性和轻量级的特性,还可以使您轻松地完成动态管理的工作负担,并根据业务需求指示,实时扩展或拆除应用程序和服务。
3、在同一硬件上运行更多工作负载
Docker 轻巧快速。它为基于虚拟机管理程序的虚拟机提供了可行、经济、高效的替代方案,因此您可以利用更多的计算能力来实现业务目标。Docker 非常适合于高密度环境以及中小型部署,而您可以用更少的资源做更多的事情。
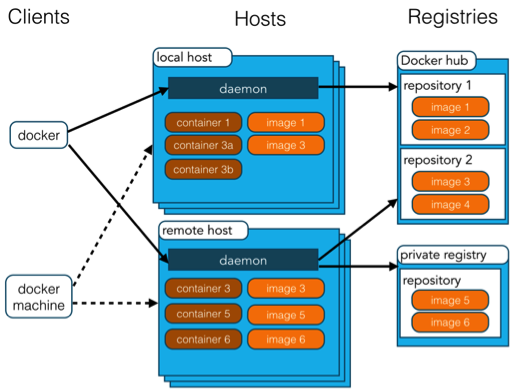
1.3 Docker 架构
Docker 包括三个基本概念:
- 镜像(Image):Docker 镜像(Image),就相当于是一个 root 文件系统。比如官方镜像 ubuntu:16.04 就包含了完整的一套 Ubuntu16.04 最小系统的 root 文件系统。
- 容器(Container):镜像(Image)和容器(Container)的关系,就像是面向对象程序设计中的类和实例一样,镜像是静态的定义,容器是镜像运行时的实体。容器可以被创建、启动、停止、删除、暂停等。
- 仓库(Repository):仓库可看成一个代码控制中心,用来保存镜像。
Docker 使用客户端-服务器 (C/S) 架构模式,使用远程API来管理和创建Docker容器。
Docker 容器通过 Docker 镜像来创建。
容器与镜像的关系类似于面向对象编程中的对象与类。
| Docker | 面向对象 |
|---|---|
| 容器 | 对象 |
| 镜像 | 类 |
| 概念 | 说明 |
|---|---|
| Docker 镜像(Images) | Docker 镜像是用于创建 Docker 容器的模板,比如 Ubuntu 系统。 |
| Docker 容器(Container) | 容器是独立运行的一个或一组应用,是镜像运行时的实体。 |
| Docker 客户端(Client) | Docker 客户端通过命令行或者其他工具使用 Docker SDK (https://docs.docker.com/develop/sdk/) 与 Docker 的守护进程通信。 |
| Docker 主机(Host) | 一个物理或者虚拟的机器用于执行 Docker 守护进程和容器。 |
| Docker Registry | Docker 仓库用来保存镜像,可以理解为代码控制中的代码仓库。 Docker Hub(https://hub.docker.com) 提供了庞大的镜像集合供使用。 一个 Docker Registry 中可以包含多个仓库(Repository);每个仓库可以包含多个标签(Tag);每个标签对应一个镜像。 通常,一个仓库会包含同一个软件不同版本的镜像,而标签就常用于对应该软件的各个版本。我们可以通过 <仓库名>:<标签> 的格式来指定具体是这个软件哪个版本的镜像。如果不给出标签,将以 latest 作为默认标签。 |
| Docker Machine | Docker Machine是一个简化Docker安装的命令行工具,通过一个简单的命令行即可在相应的平台上安装Docker,比如VirtualBox、 Digital Ocean、Microsoft Azure。 |
1.4 常用的镜像仓库
1. DockerHub
DockerHub 是一个由 Docker 公司运行和管理的基于云的存储库。它是一个在线存储库,Docker 镜像可以由其他用户发布和使用。有两种库:公共存储库和私有存储库。如果你是一家公司,你可以在你自己的组织内拥有一个私有存储库,而公共镜像可以被任何人使用。
DockerHub 上发布了数千镜像供你使用。DockerHub 作为默认存储库硬编码到 Docker 中,所以当你对任何镜像运行 docker pull 命令时,它将从 DockerHub 下载。
仓库搜索地址:https://registry.hub.docker.com/search?type=image
2. 阿里云CR
阿里云提供了面向个人和企业的镜像仓库需要登录控制台https://cr.console.aliyun.com/cn-hangzhou/instance/dashboard后使用,如下图所示:

其他阿里云关于容器和镜像请参考https://cr.console.aliyun.com(需要登录)
2. docker 安装
2.1 安装
基于linux的安装,请请参考阿里云容器服务 ACK
此处仅列出CentOS 7的安装步骤
# step 1: 安装必要的一些系统工具
sudo yum install -y yum-utils device-mapper-persistent-data lvm2

# Step 2: 添加软件源信息
sudo yum-config-manager --add-repo http://mirrors.aliyun.com/docker-ce/linux/centos/docker-ce.repo

# Step 3: 更新并安装 Docker-CE
sudo yum makecache fast
sudo yum -y install docker-ce

# Step 4: 开启Docker服务
sudo service docker start2.2 安装校验
安装完成后执行 docker version命令查看到当前docker服务的版本如下(因为使用的是最新版本安装,此处版本号可能不一样是正确的):
[root@zhangshun redis.conf]# docker version
Client: Docker Engine - Community
 Version:           20.10.6
 API version:       1.41
 Go version:        go1.13.15
 Git commit:        370c289
 Built:             Fri Apr  9 22:45:33 2021
 OS/Arch:           linux/amd64
 Context:           default
 Experimental:      true

Server: Docker Engine - Community
 Engine:
  Version:          20.10.6
  API version:      1.41 (minimum version 1.12)
  Go version:       go1.13.15
  Git commit:       8728dd2
  Built:            Fri Apr  9 22:43:57 2021
  OS/Arch:          linux/amd64
  Experimental:     false
 containerd:
  Version:          1.4.4
  GitCommit:        05f951a3781f4f2c1911b05e61c160e9c30eaa8e
 runc:
  Version:          1.0.0-rc93
  GitCommit:        12644e614e25b05da6fd08a38ffa0cfe1903fdec
 docker-init:
  Version:          0.19.0
GitCommit: de40ad02.3 设置镜像加速器
国内从 DockerHub 拉取镜像有时会遇到困难,此时可以配置镜像加速器。Docker 官方和国内很多云服务商都提供了国内加速器服务,例如:
- 科大镜像:https://docker.mirrors.ustc.edu.cn/
- 网易:https://hub-mirror.c.163.com/
- 阿里云:
https://<你的ID>.mirror.aliyuncs.com - 七牛云加速器:https://reg-mirror.qiniu.com
当配置某一个加速器地址之后,若发现拉取不到镜像,请切换到另一个加速器地址。国内各大云服务商均提供了 Docker 镜像加速服务,建议根据运行 Docker 的云平台选择对应的镜像加速服务。
阿里云镜像获取地址:https://cr.console.aliyun.com/cn-hangzhou/instances/mirrors,登陆后,左侧菜单选中镜像加速器就可以看到你的专属地址了:

3. 常用命令
3.1 搜索镜像
如搜索redis镜像
使用docker search redis命令,会从默认仓库中查找redis相关的镜像
[root@zhangshun conf]# docker search redis
NAME                             DESCRIPTION                                     STARS     OFFICIAL   AUTOMATED
redis                            Redis is an open source key-value store that…   9466      [OK]
bitnami/redis                    Bitnami Redis Docker Image                      181                  [OK]
grokzen/redis-cluster            Redis cluster 3.0, 3.2, 4.0, 5.0, 6.0, 6.2      78
rediscommander/redis-commander   Alpine image for redis-commander - Redis man…   58                   [OK]
redislabs/redisearch             Redis With the RedisSearch module pre-loaded…   34
kubeguide/redis-master           redis-master with "Hello World!"                33
redislabs/redis                  Clustered in-memory database engine compatib…   30
redislabs/redisinsight           RedisInsight - The GUI for Redis                30
oliver006/redis_exporter          Prometheus Exporter for Redis Metrics. Supp…   25
arm32v7/redis                    Redis is an open source key-value store that…   23
redislabs/rejson                 RedisJSON - Enhanced JSON data type processi…   23
bitnami/redis-sentinel           Bitnami Docker Image for Redis Sentinel         22                   [OK]
redislabs/redisgraph             A graph database module for Redis               15                   [OK]
redislabs/redismod               An automated build of redismod - latest Redi…   12                   [OK]
arm64v8/redis                    Redis is an open source key-value store that…   12
webhippie/redis                  Docker images for Redis                         11                   [OK]
insready/redis-stat              Docker image for the real-time Redis monitor…   10                   [OK]
s7anley/redis-sentinel-docker    Redis Sentinel                                  10                   [OK]
goodsmileduck/redis-cli          redis-cli on alpine                             9                    [OK]
circleci/redis                   CircleCI images for Redis                       7                    [OK]
centos/redis-32-centos7          Redis in-memory data structure store, used a…   5
clearlinux/redis                 Redis key-value data structure server with t…   3
tiredofit/redis                  Redis Server w/ Zabbix monitoring and S6 Ove…   1                    [OK]
wodby/redis                      Redis container image with orchestration        1                    [OK]
xetamus/redis-resource forked redis-resource 0 [OK]3.2 拉取镜像
使用docker pull [镜像仓库]/镜像名称:[tag版本]命令拉去镜像如
镜像仓库:如果默认不写则拉取DockerHub仓库,也可以使用其他的镜像仓库。
tag版本:拉取的镜像版本,如果不写默认为latest,即最后一次版本。
此处展示拉取redis最新镜像版本命令如下
[root@zhangshun conf]# docker pull redis:latest
latest: Pulling from library/redis
69692152171a: Pull complete
a4a46f2fd7e0: Pull complete
bcdf6fddc3bd: Pull complete
b7e9b50900cc: Pull complete
5f3030c50d85: Pull complete
63dae8e0776c: Pull complete
Digest: sha256:365eddf64356169aa0cbfbeaf928eb80762de3cc364402e7653532bcec912973
Status: Downloaded newer image for redis:latest
docker.io/library/redis:latest3.3 查看本地镜像
使用docker images 列出本地镜像信息
[root@zhangshun conf]# docker images
REPOSITORY        TAG       IMAGE ID       CREATED       SIZE
redis             latest    bc8d70f9ef6c   9 days ago    105MB
jenkins/jenkins   lts       de181f8c70e8   4 weeks ago   569MB
mysql             5.7       87eca374c0ed   4 weeks ago   447MB
registry latest 1fd8e1b0bb7e 5 weeks ago 26.2MB各个选项说明:
- **REPOSITORY:**表示镜像的仓库源
- **TAG:**镜像的标签
- **IMAGE ID:**镜像ID
- **CREATED:**镜像创建时间
- **SIZE:**镜像大小
3.4 删除镜像
使用docker rmi 镜像的名字 命令删除镜像
[root@zhangshun conf]# docker rmi redis
Untagged: redis:latest
Untagged: redis@sha256:365eddf64356169aa0cbfbeaf928eb80762de3cc364402e7653532bcec912973
Deleted: sha256:bc8d70f9ef6cae366eb6423fcb4699597c5a6b99126f3ced35b6b9d6d134375b
Deleted: sha256:a428dd1930bdc3ac7d127a745e384e634e9de5d09d48bf124e5a40409843d6f8
Deleted: sha256:2ab24e48ced3713450e4a4e2e9777a7255a5af08ac23010ea4d90d2a576f3120
Deleted: sha256:f8ac5137af2c2250b3f2cf67883883aa5e7ce915a329d0ee4ce8b4cff97965b5
Deleted: sha256:d6f89a74ae79d19535904575f2ee6d08881742af9f33d1f78e2a000b0d3fa26b
Deleted: sha256:ac98421641e727deccd15eed0f50bbe33f32689311fd387ad452d33731ba1f9f
Deleted: sha256:02c055ef67f5904019f43a41ea5f099996d8e7633749b6e606c400526b2c4b33需要注意,删除镜像时需要把所有使用该镜像的容器删除才可以否则会出现如下冲突提示(一般不删除)
[root@zhangshun conf]# docker rmi redis
Error response from daemon: conflict: unable to remove repository reference "redis" (must force) - container faac0845aa73 is using its referenced image bc8d70f9ef6c3.5 启动容器
使用docker run命令启动容器(如果容器不存在则创建容器)
下面以启动redis容器为例执行如下命令:
docker run -d --privileged=true -p 6379:6379 --restart always -v /root/docker/redis/conf/:/etc/redis/redis.conf -v /root/docker/redis/data:/data --name redis redis redis-server /etc/redis/redis.conf --appendonly yes执行完上述命令后即启动一个redis容器并在后台运行,使用docker ps命令查看启动的容器 使用-a参数代表所有容器包括未启动的容器
[root@zhangshun conf]# docker ps -a
CONTAINER ID   IMAGE                 COMMAND                  CREATED         STATUS         PORTS                                                                                      NAMES
884e4227bdfa redis "docker-entrypoint.s…" 4 seconds ago Up 3 seconds 0.0.0.0:6379->6379/tcp, :::6379->6379/tcp redis参数详解
- 参数说明:
- -i: 交互式操作。
- -t: 终端 一般以-i 同时使用。
- -d:后天进程
- --privileged=true 大约在0.6版,privileged被引入docker。 使用该参数,container内的root拥有真正的root权限。 否则,container内的root只是外部的一个普通用户权限
- -p 6379:6379 将宿主机的6379 端口转发给容器的6379
- --restart always 在容器退出时总是重启容器
- -v /root/docker/redis/conf/:/etc/redis/redis.conf 映射宿主机和容器的配置文件目录
- -v /root/docker/redis/data:/data 映射宿主机和容器的持久化数据的文件目录
- redis-server /etc/redis/redis.conf --appendonly yes : 在容器执行redis-server启动命令,并打开redis持久化配置
- /etc/redis/redis.conf redis服务启动时加载的配置文件
- --appendonly yes 以实现数据的持久化存储,即将数据保存到磁盘上。
端口映射的问题
两种方式的区别是:
- -P :是容器内部端口随机映射到主机的高端口。
- -p : 是容器内部端口绑定到指定的主机端口。
restart其他参考值
no,默认策略,在容器退出时不重启容器 on-failure,在容器非正常退出时(退出状态非0),才会重启容器 on-failure:3,在容器非正常退出时重启容器,最多重启3次 always,在容器退出时总是重启容器 unless-stopped,在容器退出时总是重启容器,但是不考虑在Docker守护进程启动时就已经停止了的容器
3.6 进入镜像
在运行的容器中执行命令需要使用docker exec [OPTIONS] CONTAINER COMMAND [ARG...] 命令
如进入到redis容器使用redis-cli访问数据
[root@zhangshun conf]# docker exec -it redis /bin/bash
root@884e4227bdfa:/data#执行完docker exec 命令后发现已经进入到容器中,命令提示符的前缀已经变成root@884e4227bdfa:/data#
此时可以启动redis-cli客户端连接redis服务
#进入redis-cli命令所在的目录
root@884e4227bdfa:/# cd /usr/local/bin/

#列目录
root@884e4227bdfa:/usr/local/bin# ls -l
total 27596
-rwxrwxr-x 1 root root      374 May 12 19:06 docker-entrypoint.sh
-rwxr-xr-x 1 root root  2404352 Apr 16  2020 gosu
-rwxr-xr-x 1 root root  6903120 May 12 19:07 redis-benchmark
lrwxrwxrwx 1 root root       12 May 12 19:07 redis-check-aof -> redis-server
lrwxrwxrwx 1 root root       12 May 12 19:07 redis-check-rdb -> redis-server
-rwxr-xr-x 1 root root  6754464 May 12 19:07 redis-cli
lrwxrwxrwx 1 root root       12 May 12 19:07 redis-sentinel -> redis-server
-rwxr-xr-x 1 root root 12183728 May 12 19:07 redis-server

#启动redis客户端
root@884e4227bdfa:/usr/local/bin# ./redis-cli

#查询所有的key
127.0.0.1:6379> keys *
1) "address2"
2) "age"
3) "name"
4) "address"

#设置key value
127.0.0.1:6379> set friends 100
OK

#获取key
127.0.0.1:6379> get friends
"100"
#查询所有的key
127.0.0.1:6379> keys *
1) "age"
2) "friends"
3) "name"
4) "address2"
5) "address"
127.0.0.1:6379>

#等其他redis操作当需要退出容器的交互操作时执行exit操作即可
3.7 容器的启动和停止
- 停止
docker stop 容器名称/ID- 启动
docker start 容器名称/ID3.8 获取docker容器/镜像的元数据
docker inspect : 获取容器/镜像的元数据。
语法
docker inspect [OPTIONS] NAME|ID [NAME|ID...]OPTIONS说明:
- **-f 😗*指定返回值的模板文件。
- **-s 😗*显示总的文件大小。
**--type 😗*为指定类型返回JSON。
[root@zhangshun conf]# docker inspect redis
[
    {
        "Id": "884e4227bdfa827ff5f0578c14df0ca502d18332e977b5a00c46c42a7a523fcd",
        "Created": "2021-05-22T07:40:08.689571806Z",
        "Path": "docker-entrypoint.sh",
        "Args": [
            "redis-server",
            "/etc/redis/redis.conf",
            "--appendonly",
            "yes"
        ],
        "State": {
            "Status": "running",
            "Running": true,
            "Paused": false,
            "Restarting": false,
            "OOMKilled": false,
            "Dead": false,
            "Pid": 26248,
            "ExitCode": 0,
            "Error": "",
            "StartedAt": "2021-05-22T07:40:08.93051325Z",
            "FinishedAt": "0001-01-01T00:00:00Z"
        },
        "Image": "sha256:bc8d70f9ef6cae366eb6423fcb4699597c5a6b99126f3ced35b6b9d6d134375b",
        "ResolvConfPath": "/var/lib/docker/containers/884e4227bdfa827ff5f0578c14df0ca502d18332e977b5a00c46c42a7a523fcd/resolv.conf",
        "HostnamePath": "/var/lib/docker/containers/884e4227bdfa827ff5f0578c14df0ca502d18332e977b5a00c46c42a7a523fcd/hostname",
        "HostsPath": "/var/lib/docker/containers/884e4227bdfa827ff5f0578c14df0ca502d18332e977b5a00c46c42a7a523fcd/hosts",
        "LogPath": "/var/lib/docker/containers/884e4227bdfa827ff5f0578c14df0ca502d18332e977b5a00c46c42a7a523fcd/884e4227bdfa827ff5f0578c14df0ca502d18332e977b5a00c46c42a7a523fcd-json.log",
        "Name": "/redis",
        "RestartCount": 0,
        "Driver": "overlay2",
        "Platform": "linux",
        "MountLabel": "",
        "ProcessLabel": "",
        "AppArmorProfile": "",
        "ExecIDs": null,
        "HostConfig": {
            "Binds": [
                "/root/docker/redis/data:/data",
                "/root/docker/redis/conf/:/etc/redis/redis.conf"
            ],
            "ContainerIDFile": "",
            "LogConfig": {
                "Type": "json-file",
                "Config": {}
            },
            "NetworkMode": "default",
            "PortBindings": {
                "6379/tcp": [
                    {
                        "HostIp": "",
                        "HostPort": "6379"
                    }
                ]
            },
            "RestartPolicy": {
                "Name": "always",
                "MaximumRetryCount": 0
            },
            "AutoRemove": false,
            "VolumeDriver": "",
            "VolumesFrom": null,
            "CapAdd": null,
            "CapDrop": null,
            "CgroupnsMode": "host",
            "Dns": [],
            "DnsOptions": [],
            "DnsSearch": [],
            "ExtraHosts": null,
            "GroupAdd": null,
            "IpcMode": "private",
            "Cgroup": "",
            "Links": null,
            "OomScoreAdj": 0,
            "PidMode": "",
            "Privileged": true,
            "PublishAllPorts": false,
            "ReadonlyRootfs": false,
            "SecurityOpt": [
                "label=disable"
            ],
            "UTSMode": "",
            "UsernsMode": "",
            "ShmSize": 67108864,
            "Runtime": "runc",
            "ConsoleSize": [
                0,
                0
            ],
            "Isolation": "",
            "CpuShares": 0,
            "Memory": 0,
            "NanoCpus": 0,
            "CgroupParent": "",
            "BlkioWeight": 0,
            "BlkioWeightDevice": [],
            "BlkioDeviceReadBps": null,
            "BlkioDeviceWriteBps": null,
            "BlkioDeviceReadIOps": null,
            "BlkioDeviceWriteIOps": null,
            "CpuPeriod": 0,
            "CpuQuota": 0,
            "CpuRealtimePeriod": 0,
            "CpuRealtimeRuntime": 0,
            "CpusetCpus": "",
            "CpusetMems": "",
            "Devices": [],
            "DeviceCgroupRules": null,
            "DeviceRequests": null,
            "KernelMemory": 0,
            "KernelMemoryTCP": 0,
            "MemoryReservation": 0,
            "MemorySwap": 0,
            "MemorySwappiness": null,
            "OomKillDisable": false,
            "PidsLimit": null,
            "Ulimits": null,
            "CpuCount": 0,
            "CpuPercent": 0,
            "IOMaximumIOps": 0,
            "IOMaximumBandwidth": 0,
            "MaskedPaths": null,
            "ReadonlyPaths": null
        },
        "GraphDriver": {
            "Data": {
                "LowerDir": "/var/lib/docker/overlay2/0755e617fca6e0086f8d4d09879cf7c737e8359b408937b6116f6adc0e07f9a6-init/diff:/var/lib/docker/overlay2/72080d6e0cd721bbec6dd3c2c72cf05d4a04803d275f534105f9fb7caea02bea/diff:/var/lib/docker/overlay2/dd2d2c5fb4d39c513bc143d73ae8e1d26468d4848d83f96a9f81faec67c14455/diff:/var/lib/docker/overlay2/e126f58f651a27e1dd11575f06c599d74b94e73e896f474c475664f059d140cf/diff:/var/lib/docker/overlay2/59815fc68af8068a482781e4455ad78d7b92d43ff132b2ed6af3a139e6a8acd7/diff:/var/lib/docker/overlay2/6137c27a7c4583d2a2e8f9c377d24e5430a8d5ef5ee835bfd948dff45a32ecae/diff:/var/lib/docker/overlay2/10bd61777f9436d8f066ebcbd16ccdd11f6ce6102a0bd14798891a47de1ad266/diff",
                "MergedDir": "/var/lib/docker/overlay2/0755e617fca6e0086f8d4d09879cf7c737e8359b408937b6116f6adc0e07f9a6/merged",
                "UpperDir": "/var/lib/docker/overlay2/0755e617fca6e0086f8d4d09879cf7c737e8359b408937b6116f6adc0e07f9a6/diff",
                "WorkDir": "/var/lib/docker/overlay2/0755e617fca6e0086f8d4d09879cf7c737e8359b408937b6116f6adc0e07f9a6/work"
            },
            "Name": "overlay2"
        },
        "Mounts": [
            {
                "Type": "bind",
                "Source": "/root/docker/redis/data",
                "Destination": "/data",
                "Mode": "",
                "RW": true,
                "Propagation": "rprivate"
            },
            {
                "Type": "bind",
                "Source": "/root/docker/redis/conf",
                "Destination": "/etc/redis/redis.conf",
                "Mode": "",
                "RW": true,
                "Propagation": "rprivate"
            }
        ],
        "Config": {
            "Hostname": "884e4227bdfa",
            "Domainname": "",
            "User": "",
            "AttachStdin": false,
            "AttachStdout": false,
            "AttachStderr": false,
            "ExposedPorts": {
                "6379/tcp": {}
            },
            "Tty": false,
            "OpenStdin": false,
            "StdinOnce": false,
            "Env": [
                "PATH=/usr/local/sbin:/usr/local/bin:/usr/sbin:/usr/bin:/sbin:/bin",
                "GOSU_VERSION=1.12",
                "REDIS_VERSION=6.2.3",
                "REDIS_DOWNLOAD_URL=http://download.redis.io/releases/redis-6.2.3.tar.gz",
                "REDIS_DOWNLOAD_SHA=98ed7d532b5e9671f5df0825bb71f0f37483a16546364049384c63db8764512b"
            ],
            "Cmd": [
                "redis-server",
                "/etc/redis/redis.conf",
                "--appendonly",
                "yes"
            ],
            "Image": "redis",
            "Volumes": {
                "/data": {}
            },
            "WorkingDir": "/data",
            "Entrypoint": [
                "docker-entrypoint.sh"
            ],
            "OnBuild": null,
            "Labels": {}
        },
        "NetworkSettings": {
            "Bridge": "",
            "SandboxID": "6932c878b20028a6eb72bfd9ebcc568e92a74067bef9175d88de3363074a4b1c",
            "HairpinMode": false,
            "LinkLocalIPv6Address": "",
            "LinkLocalIPv6PrefixLen": 0,
            "Ports": {
                "6379/tcp": [
                    {
                        "HostIp": "0.0.0.0",
                        "HostPort": "6379"
                    },
                    {
                        "HostIp": "::",
                        "HostPort": "6379"
                    }
                ]
            },
            "SandboxKey": "/var/run/docker/netns/6932c878b200",
            "SecondaryIPAddresses": null,
            "SecondaryIPv6Addresses": null,
            "EndpointID": "edb987f0702707198c149fd4d4e222f957c6cc4d246e4a76f4f14a1e82a9286b",
            "Gateway": "172.18.0.1",
            "GlobalIPv6Address": "",
            "GlobalIPv6PrefixLen": 0,
            "IPAddress": "172.18.0.4",
            "IPPrefixLen": 16,
            "IPv6Gateway": "",
            "MacAddress": "02:42:ac:12:00:04",
            "Networks": {
                "bridge": {
                    "IPAMConfig": null,
                    "Links": null,
                    "Aliases": null,
                    "NetworkID": "bc39f566bf4d355d140b70a06f24cdfabe6ab8247265fac263e90ebb33a13ffc",
                    "EndpointID": "edb987f0702707198c149fd4d4e222f957c6cc4d246e4a76f4f14a1e82a9286b",
                    "Gateway": "172.18.0.1",
                    "IPAddress": "172.18.0.4",
                    "IPPrefixLen": 16,
                    "IPv6Gateway": "",
                    "GlobalIPv6Address": "",
                    "GlobalIPv6PrefixLen": 0,
                    "MacAddress": "02:42:ac:12:00:04",
                    "DriverOpts": null
                }
            }
        }
    }
]
[root@zhangshun conf]#3.9 容器的删除
当需要删除容器时使用docker rm 容器名称/ID命令操作,主要注意的是容器在删除的时候必须是停止状态,否则会出现如下冲突提示
[root@zhangshun conf]# docker rm redis
Error response from daemon: You cannot remove a running container faac0845aa73ba2cb6b08e99a9e467f06ebe0b9ea3a0074830591de71872f7fe. Stop the container before attempting removal or force remove3.10 将容器打标
docker tag : 标记本地镜像,将其归入某一仓库。
docker tag [OPTIONS] IMAGE[:TAG] [REGISTRYHOST/][USERNAME/]NAME[:TAG]4. Docker系统情况
查看docker 空间使用情况 使用
docker system df查看系统占用情况
[root@zhangshun conf]# docker system df
TYPE            TOTAL     ACTIVE    SIZE      RECLAIMABLE
Images          4         4         1.147GB   0B (0%)
Containers      4         3         6.638MB   0B (0%)
Local Volumes   3         0         92B       92B (100%)
Build Cache 0 0 0B 0B查看实时事件(例如容器创建,删除等均会实时显示)
[root@zhangshun conf]# docker system events查看docker 系统信息(同docker info)
[root@zhangshun conf]# docker system info
Client:
 Context:    default
 Debug Mode: false
 Plugins:
  app: Docker App (Docker Inc., v0.9.1-beta3)
  buildx: Build with BuildKit (Docker Inc., v0.5.1-docker)
  scan: Docker Scan (Docker Inc.)

Server:
 Containers: 4
  Running: 3
  Paused: 0
  Stopped: 1
 Images: 4
 Server Version: 20.10.6
 Storage Driver: overlay2
  Backing Filesystem: extfs
  Supports d_type: true
  Native Overlay Diff: false
  userxattr: false
 Logging Driver: json-file
 Cgroup Driver: cgroupfs
 Cgroup Version: 1
 Plugins:
  Volume: local
  Network: bridge host ipvlan macvlan null overlay
  Log: awslogs fluentd gcplogs gelf journald json-file local logentries splunk syslog
 Swarm: inactive
 Runtimes: io.containerd.runc.v2 io.containerd.runtime.v1.linux runc
 Default Runtime: runc
 Init Binary: docker-init
 containerd version: 05f951a3781f4f2c1911b05e61c160e9c30eaa8e
 runc version: 12644e614e25b05da6fd08a38ffa0cfe1903fdec
 init version: de40ad0
 Security Options:
  seccomp
   Profile: default
 Kernel Version: 3.10.0-514.26.2.el7.x86_64
 Operating System: CentOS Linux 7 (Core)
 OSType: linux
 Architecture: x86_64
 CPUs: 2
 Total Memory: 3.562GiB
 Name: zhangshun
 ID: ZOTQ:WZTJ:R6JU:OULT:LVRD:NKOA:NGVD:4H4W:C7PJ:7JTY:F6W3:6HME
 Docker Root Dir: /var/lib/docker
 Debug Mode: false
 Registry: https://index.docker.io/v1/
 Labels:
 Experimental: false
 Insecure Registries:
  127.0.0.0/8
 Registry Mirrors:
  https://aaaaa.mirror.aliyuncs.com/
Live Restore Enabled: falsedocker清理(清理停止的容器,没用容器使用的网络,镜像,缓存) 慎重操作
[root@zhangshun conf]# docker system prune
WARNING! This will remove:
  - all stopped containers
  - all networks not used by at least one container
  - all dangling images
  - all dangling build cache

Are you sure you want to continue? [y/N] y
]Deleted Containers:
23e116fa68e097d456ab2fdf457ef0aeca47d6d31e66b3d07f8e4fae3c8b5e39

Total reclaimed space: 0B其他容器命令
5.制作Docker镜像
Docker中定制镜像的两种方法
5.1. 第一种方式(手动修改容器镜像)
1.先下载centos镜像
[root@docker ~]# docker pull centos2.启动容器并进行配置
启动容器,
[root@docker ~]# docker run -it -d --name test-centos1 centos
d72250ecaa5e3e36226a1edd749f494d9f00eddc4143c81ac3565aa4e551791a命令注释:-it : 进行交互式操作
-d : 等同于 -d=true,容器将会在后台运行,不然执行一次命令后,退出后,便是exit状态了。
--name : 容器启动后的名字,默认不指定,将会随机产生一个名字。或者使用 -name="containers_name"
centos:使用的镜像名称
进入容器,按照常规的方式安装服务如yum rpm等方式(此处未真正安装,略)
[root@docker ~]# docker exec -it docker-test /bin/bash*注:命令最后参数 /bin/bash: 指进入容器时执行的命令(command)
在docker容器中安装需要的软件后将容器成一个镜像 执行docker commit命令
[root@docker ~]# docker commit docker-test docker-test:1.0
sha256:6e3330b30dfff5f029f102874e54cfffffbc37dcf2a4eb7304c817148fbc944d
[root@docker ~]# docker images
REPOSITORY                   TAG                 IMAGE ID            CREATED             SIZE
centos_sshd                  7.0                 6e3330b30dff        8 seconds ago       310.1 MB
docker.io/ubuntu latest e4415b714b62 12 days ago 128.1 MB命令注释:commit: 提交一个具有新配置的容器成为镜像,后面跟容器的name 或者容器Id ,最后是生成新镜像的名字
更新:这条命令更方便以后启动,如下:
[root@docker ~]# docker commit --change='CMD ["/auto_sshd.sh"]' -c "EXPOSE 22" test-centos1 centos_sshd:7.0
sha256:7bb4efd82c4ff1f241cbc57ee45aab1b05d214b1e9fcd51196696c67d480e70b| 参数 | 默认值 | 作用 |
|---|---|---|
| —author, -a | 作者信息 | |
| —change, -c | 将Dockerfile指令应用于创建的映像 将后期使用此镜像运行容器时的命令参数、开放的容器端口提前设置好 | |
| —message, -m | 提交消息 | |
| —pause, -p | true | 提交期间暂停容器 |
4.验证
查看镜像,并启动新的容器(略)
5.2 第二种方式(推荐:利用Dockerfile文件)
Dockerfile包含创建镜像所需要的全部指令。基于在Dockerfile中的指令,我们可以使用Docker build命令来创建镜像。通过减少镜像和容器的创建过程来简化部署。此处基于Docker官方Redis镜像+Dockerfile
1.创建Dockerfile文件
新建一个目录,在里面新建一个dockerfile文件(新建一个的目录,主要是为了和以防和其它dockerfile混乱 )
新建一个名为 Dockerfile 文件,并在文件内添加以下内容:
FROM redis
MAINTAINER zhangjinshan21f@163.com
COPY redis.conf /usr/local/etc/redis/redis.conf
EXPOSE 6379
CMD [ "redis-server", "/usr/local/etc/redis/redis.conf" ]在目录中新建一个redis.conf文件并填写如下内容,作为redis的默认配置文件
# Redis配置文件样例

# Note on units: when memory size is needed, it is possible to specifiy
# it in the usual form of 1k 5GB 4M and so forth:
#
# 1k => 1000 bytes
# 1kb => 1024 bytes
# 1m => 1000000 bytes
# 1mb => 1024*1024 bytes
# 1g => 1000000000 bytes
# 1gb => 1024*1024*1024 bytes
#
# units are case insensitive so 1GB 1Gb 1gB are all the same.

# Redis默认不是以守护进程的方式运行,可以通过该配置项修改,使用yes启用守护进程
# 启用守护进程后,Redis会把pid写到一个pidfile中,在/var/run/redis.pid
daemonize no

# 当Redis以守护进程方式运行时,Redis默认会把pid写入/var/run/redis.pid文件,可以通过pidfile指定
pidfile /var/run/redis.pid

# 指定Redis监听端口,默认端口为6379
# 如果指定0端口,表示Redis不监听TCP连接
port 6379

# 绑定的主机地址
# 你可以绑定单一接口,如果没有绑定,所有接口都会监听到来的连接
# bind 127.0.0.1

# Specify the path for the unix socket that will be used to listen for
# incoming connections. There is no default, so Redis will not listen
# on a unix socket when not specified.
#
# unixsocket /tmp/redis.sock
# unixsocketperm 755

# 当客户端闲置多长时间后关闭连接,如果指定为0,表示关闭该功能
timeout 0

# 指定日志记录级别,Redis总共支持四个级别:debug、verbose、notice、warning,默认为verbose
# debug (很多信息, 对开发/测试比较有用)
# verbose (many rarely useful info, but not a mess like the debug level)
# notice (moderately verbose, what you want in production probably)
# warning (only very important / critical messages are logged)
loglevel verbose

# 日志记录方式,默认为标准输出,如果配置为redis为守护进程方式运行,而这里又配置为标准输出,则日志将会发送给/dev/null
logfile stdout

# To enable logging to the system logger, just set 'syslog-enabled' to yes,
# and optionally update the other syslog parameters to suit your needs.
# syslog-enabled no

# Specify the syslog identity.
# syslog-ident redis

# Specify the syslog facility.  Must be USER or between LOCAL0-LOCAL7.
# syslog-facility local0

# 设置数据库的数量,默认数据库为0,可以使用select `<dbid>`命令在连接上指定数据库id
# dbid是从0到‘databases’-1的数目
databases 16

################################ SNAPSHOTTING  #################################
# 指定在多长时间内,有多少次更新操作,就将数据同步到数据文件,可以多个条件配合
# Save the DB on disk:
#
#   save <seconds> <changes>
#
#   Will save the DB if both the given number of seconds and the given
#   number of write operations against the DB occurred.
#
#   满足以下条件将会同步数据:
#   900秒(15分钟)内有1个更改
#   300秒(5分钟)内有10个更改
#   60秒内有10000个更改
#   Note: 可以把所有“save”行注释掉,这样就取消同步操作了

save 900 1
save 300 10
save 60 10000

# 指定存储至本地数据库时是否压缩数据,默认为yes,Redis采用LZF压缩,如果为了节省CPU时间,可以关闭该选项,但会导致数据库文件变的巨大
rdbcompression yes

# 指定本地数据库文件名,默认值为dump.rdb
dbfilename dump.rdb

# 工作目录.
# 指定本地数据库存放目录,文件名由上一个dbfilename配置项指定
#
# Also the Append Only File will be created inside this directory.
#
# 注意,这里只能指定一个目录,不能指定文件名
dir ./

################################# REPLICATION #################################

# 主从复制。使用slaveof从 Redis服务器复制一个Redis实例。注意,该配置仅限于当前slave有效
# so for example it is possible to configure the slave to save the DB with a
# different interval, or to listen to another port, and so on.
# 设置当本机为slav服务时,设置master服务的ip地址及端口,在Redis启动时,它会自动从master进行数据同步
# slaveof <masterip> <masterport>


# 当master服务设置了密码保护时,slav服务连接master的密码
# 下文的“requirepass”配置项可以指定密码
# masterauth <master-password>

# When a slave lost the connection with the master, or when the replication
# is still in progress, the slave can act in two different ways:
#
# 1) if slave-serve-stale-data is set to 'yes' (the default) the slave will
#    still reply to client requests, possibly with out of data data, or the
#    data set may just be empty if this is the first synchronization.
#
# 2) if slave-serve-stale data is set to 'no' the slave will reply with
#    an error "SYNC with master in progress" to all the kind of commands
#    but to INFO and SLAVEOF.
#
slave-serve-stale-data yes

# Slaves send PINGs to server in a predefined interval. It's possible to change
# this interval with the repl_ping_slave_period option. The default value is 10
# seconds.
#
# repl-ping-slave-period 10

# The following option sets a timeout for both Bulk transfer I/O timeout and
# master data or ping response timeout. The default value is 60 seconds.
#
# It is important to make sure that this value is greater than the value
# specified for repl-ping-slave-period otherwise a timeout will be detected
# every time there is low traffic between the master and the slave.
#
# repl-timeout 60

################################## SECURITY ###################################

# Warning: since Redis is pretty fast an outside user can try up to
# 150k passwords per second against a good box. This means that you should
# use a very strong password otherwise it will be very easy to break.
# 设置Redis连接密码,如果配置了连接密码,客户端在连接Redis时需要通过auth <password>命令提供密码,默认关闭
# requirepass foobared

# Command renaming.
#
# It is possilbe to change the name of dangerous commands in a shared
# environment. For instance the CONFIG command may be renamed into something
# of hard to guess so that it will be still available for internal-use
# tools but not available for general clients.
#
# Example:
#
# rename-command CONFIG b840fc02d524045429941cc15f59e41cb7be6c52
#
# It is also possilbe to completely kill a command renaming it into
# an empty string:
#
# rename-command CONFIG ""

################################### LIMITS ####################################

# 设置同一时间最大客户端连接数,默认无限制,Redis可以同时打开的客户端连接数为Redis进程可以打开的最大文件描述符数,
# 如果设置maxclients 0,表示不作限制。当客户端连接数到达限制时,Redis会关闭新的连接并向客户端返回max Number of clients reached错误信息
# maxclients 128

# Don't use more memory than the specified amount of bytes.
# When the memory limit is reached Redis will try to remove keys with an
# EXPIRE set. It will try to start freeing keys that are going to expire
# in little time and preserve keys with a longer time to live.
# Redis will also try to remove objects from free lists if possible.
#
# If all this fails, Redis will start to reply with errors to commands
# that will use more memory, like SET, LPUSH, and so on, and will continue
# to reply to most read-only commands like GET.
#
# WARNING: maxmemory can be a good idea mainly if you want to use Redis as a
# 'state' server or cache, not as a real DB. When Redis is used as a real
# database the memory usage will grow over the weeks, it will be obvious if
# it is going to use too much memory in the long run, and you'll have the time
# to upgrade. With maxmemory after the limit is reached you'll start to get
# errors for write operations, and this may even lead to DB inconsistency.
# 指定Redis最大内存限制,Redis在启动时会把数据加载到内存中,达到最大内存后,Redis会先尝试清除已到期或即将到期的Key,
# 当此方法处理后,仍然到达最大内存设置,将无法再进行写入操作,但仍然可以进行读取操作。
# Redis新的vm机制,会把Key存放内存,Value会存放在swap区
# maxmemory <bytes>

# MAXMEMORY POLICY: how Redis will select what to remove when maxmemory
# is reached? You can select among five behavior:
#
# volatile-lru -> remove the key with an expire set using an LRU algorithm
# allkeys-lru -> remove any key accordingly to the LRU algorithm
# volatile-random -> remove a random key with an expire set
# allkeys->random -> remove a random key, any key
# volatile-ttl -> remove the key with the nearest expire time (minor TTL)
# noeviction -> don't expire at all, just return an error on write operations
#
# Note: with all the kind of policies, Redis will return an error on write
#       operations, when there are not suitable keys for eviction.
#
#       At the date of writing this commands are: set setnx setex append
#       incr decr rpush lpush rpushx lpushx linsert lset rpoplpush sadd
#       sinter sinterstore sunion sunionstore sdiff sdiffstore zadd zincrby
#       zunionstore zinterstore hset hsetnx hmset hincrby incrby decrby
#       getset mset msetnx exec sort
#
# The default is:
#
# maxmemory-policy volatile-lru

# LRU and minimal TTL algorithms are not precise algorithms but approximated
# algorithms (in order to save memory), so you can select as well the sample
# size to check. For instance for default Redis will check three keys and
# pick the one that was used less recently, you can change the sample size
# using the following configuration directive.
#
# maxmemory-samples 3

############################## APPEND ONLY MODE ###############################

#
# Note that you can have both the async dumps and the append only file if you
# like (you have to comment the "save" statements above to disable the dumps).
# Still if append only mode is enabled Redis will load the data from the
# log file at startup ignoring the dump.rdb file.
# 指定是否在每次更新操作后进行日志记录,Redis在默认情况下是异步的把数据写入磁盘,如果不开启,可能会在断电时导致一段时间内的数据丢失。
# 因为redis本身同步数据文件是按上面save条件来同步的,所以有的数据会在一段时间内只存在于内存中。默认为no
# IMPORTANT: Check the BGREWRITEAOF to check how to rewrite the append
# log file in background when it gets too big.

appendonly no

# 指定更新日志文件名,默认为appendonly.aof
# appendfilename appendonly.aof

# The fsync() call tells the Operating System to actually write data on disk
# instead to wait for more data in the output buffer. Some OS will really flush
# data on disk, some other OS will just try to do it ASAP.

# 指定更新日志条件,共有3个可选值:
# no:表示等操作系统进行数据缓存同步到磁盘(快)
# always:表示每次更新操作后手动调用fsync()将数据写到磁盘(慢,安全)
# everysec:表示每秒同步一次(折衷,默认值)

appendfsync everysec
# appendfsync no

# When the AOF fsync policy is set to always or everysec, and a background
# saving process (a background save or AOF log background rewriting) is
# performing a lot of I/O against the disk, in some Linux configurations
# Redis may block too long on the fsync() call. Note that there is no fix for
# this currently, as even performing fsync in a different thread will block
# our synchronous write(2) call.
#
# In order to mitigate this problem it's possible to use the following option
# that will prevent fsync() from being called in the main process while a
# BGSAVE or BGREWRITEAOF is in progress.
#
# This means that while another child is saving the durability of Redis is
# the same as "appendfsync none", that in pratical terms means that it is
# possible to lost up to 30 seconds of log in the worst scenario (with the
# default Linux settings).
#
# If you have latency problems turn this to "yes". Otherwise leave it as
# "no" that is the safest pick from the point of view of durability.
no-appendfsync-on-rewrite no

# Automatic rewrite of the append only file.
# Redis is able to automatically rewrite the log file implicitly calling
# BGREWRITEAOF when the AOF log size will growth by the specified percentage.
#
# This is how it works: Redis remembers the size of the AOF file after the
# latest rewrite (or if no rewrite happened since the restart, the size of
# the AOF at startup is used).
#
# This base size is compared to the current size. If the current size is
# bigger than the specified percentage, the rewrite is triggered. Also
# you need to specify a minimal size for the AOF file to be rewritten, this
# is useful to avoid rewriting the AOF file even if the percentage increase
# is reached but it is still pretty small.
#
# Specify a precentage of zero in order to disable the automatic AOF
# rewrite feature.

auto-aof-rewrite-percentage 100
auto-aof-rewrite-min-size 64mb

################################## SLOW LOG ###################################

# The Redis Slow Log is a system to log queries that exceeded a specified
# execution time. The execution time does not include the I/O operations
# like talking with the client, sending the reply and so forth,
# but just the time needed to actually execute the command (this is the only
# stage of command execution where the thread is blocked and can not serve
# other requests in the meantime).
#
# You can configure the slow log with two parameters: one tells Redis
# what is the execution time, in microseconds, to exceed in order for the
# command to get logged, and the other parameter is the length of the
# slow log. When a new command is logged the oldest one is removed from the
# queue of logged commands.

# The following time is expressed in microseconds, so 1000000 is equivalent
# to one second. Note that a negative number disables the slow log, while
# a value of zero forces the logging of every command.
slowlog-log-slower-than 10000

# There is no limit to this length. Just be aware that it will consume memory.
# You can reclaim memory used by the slow log with SLOWLOG RESET.
slowlog-max-len 1024

################################ VIRTUAL MEMORY ###############################

### WARNING! Virtual Memory is deprecated in Redis 2.4
### The use of Virtual Memory is strongly discouraged.

### WARNING! Virtual Memory is deprecated in Redis 2.4
### The use of Virtual Memory is strongly discouraged.

# Virtual Memory allows Redis to work with datasets bigger than the actual
# amount of RAM needed to hold the whole dataset in memory.
# In order to do so very used keys are taken in memory while the other keys
# are swapped into a swap file, similarly to what operating systems do
# with memory pages.
# 指定是否启用虚拟内存机制,默认值为no,
# VM机制将数据分页存放,由Redis将访问量较少的页即冷数据swap到磁盘上,访问多的页面由磁盘自动换出到内存中
# 把vm-enabled设置为yes,根据需要设置好接下来的三个VM参数,就可以启动VM了
vm-enabled no
# vm-enabled yes

# This is the path of the Redis swap file. As you can guess, swap files
# can't be shared by different Redis instances, so make sure to use a swap
# file for every redis process you are running. Redis will complain if the
# swap file is already in use.
#
# Redis交换文件最好的存储是SSD(固态硬盘)
# 虚拟内存文件路径,默认值为/tmp/redis.swap,不可多个Redis实例共享
# *** WARNING *** if you are using a shared hosting the default of putting
# the swap file under /tmp is not secure. Create a dir with access granted
# only to Redis user and configure Redis to create the swap file there.
vm-swap-file /tmp/redis.swap

# With vm-max-memory 0 the system will swap everything it can. Not a good
# default, just specify the max amount of RAM you can in bytes, but it's
# better to leave some margin. For instance specify an amount of RAM
# that's more or less between 60 and 80% of your free RAM.
# 将所有大于vm-max-memory的数据存入虚拟内存,无论vm-max-memory设置多少,所有索引数据都是内存存储的(Redis的索引数据就是keys)
# 也就是说当vm-max-memory设置为0的时候,其实是所有value都存在于磁盘。默认值为0
vm-max-memory 0

# Redis swap文件分成了很多的page,一个对象可以保存在多个page上面,但一个page上不能被多个对象共享,vm-page-size是要根据存储的数据大小来设定的。
# 建议如果存储很多小对象,page大小最后设置为32或64bytes;如果存储很大的对象,则可以使用更大的page,如果不确定,就使用默认值
vm-page-size 32

# 设置swap文件中的page数量由于页表(一种表示页面空闲或使用的bitmap)是存放在内存中的,在磁盘上每8个pages将消耗1byte的内存
# swap空间总容量为 vm-page-size * vm-pages
#
# With the default of 32-bytes memory pages and 134217728 pages Redis will
# use a 4 GB swap file, that will use 16 MB of RAM for the page table.
#
# It's better to use the smallest acceptable value for your application,
# but the default is large in order to work in most conditions.
vm-pages 134217728

# Max number of VM I/O threads running at the same time.
# This threads are used to read/write data from/to swap file, since they
# also encode and decode objects from disk to memory or the reverse, a bigger
# number of threads can help with big objects even if they can't help with
# I/O itself as the physical device may not be able to couple with many
# reads/writes operations at the same time.
# 设置访问swap文件的I/O线程数,最后不要超过机器的核数,如果设置为0,那么所有对swap文件的操作都是串行的,可能会造成比较长时间的延迟,默认值为4
vm-max-threads 4

############################### ADVANCED CONFIG ###############################

# Hashes are encoded in a special way (much more memory efficient) when they
# have at max a given numer of elements, and the biggest element does not
# exceed a given threshold. You can configure this limits with the following
# configuration directives.
# 指定在超过一定的数量或者最大的元素超过某一临界值时,采用一种特殊的哈希算法
hash-max-zipmap-entries 512
hash-max-zipmap-value 64

# Similarly to hashes, small lists are also encoded in a special way in order
# to save a lot of space. The special representation is only used when
# you are under the following limits:
list-max-ziplist-entries 512
list-max-ziplist-value 64

# Sets have a special encoding in just one case: when a set is composed
# of just strings that happens to be integers in radix 10 in the range
# of 64 bit signed integers.
# The following configuration setting sets the limit in the size of the
# set in order to use this special memory saving encoding.
set-max-intset-entries 512

# Similarly to hashes and lists, sorted sets are also specially encoded in
# order to save a lot of space. This encoding is only used when the length and
# elements of a sorted set are below the following limits:
zset-max-ziplist-entries 128
zset-max-ziplist-value 64

# Active rehashing uses 1 millisecond every 100 milliseconds of CPU time in
# order to help rehashing the main Redis hash table (the one mapping top-level
# keys to values). The hash table implementation redis uses (see dict.c)
# performs a lazy rehashing: the more operation you run into an hash table
# that is rhashing, the more rehashing "steps" are performed, so if the
# server is idle the rehashing is never complete and some more memory is used
# by the hash table.
#
# The default is to use this millisecond 10 times every second in order to
# active rehashing the main dictionaries, freeing memory when possible.
#
# If unsure:
# use "activerehashing no" if you have hard latency requirements and it is
# not a good thing in your environment that Redis can reply form time to time
# to queries with 2 milliseconds delay.
# 指定是否激活重置哈希,默认为开启
activerehashing yes

################################## INCLUDES ###################################

# 指定包含其他的配置文件,可以在同一主机上多个Redis实例之间使用同一份配置文件,而同时各实例又拥有自己的特定配置文件
# include /path/to/local.conf
# include /path/to/other.conf构建镜像
docker build -t redis:v999 . 注意最后一个点代表执行构建的上下文为当前目录。
[root@zhangshun dockerfile]# docker build -t redis:v999 .
Sending build context to Docker daemon  23.04kB
Step 1/5 : FROM redis
 ---> bc8d70f9ef6c
Step 2/5 : MAINTAINER zhangjinshan21f@163.com
 ---> Using cache
 ---> 88fa38abb82d
Step 3/5 : COPY redis.conf /usr/local/etc/redis/redis.conf
 ---> 7ee794ad2a0d
Step 4/5 : EXPOSE 6379
 ---> Running in a8dfa7fbd06e
Removing intermediate container a8dfa7fbd06e
 ---> 9a0a09e7b06a
Step 5/5 : CMD [ "redis-server", "/usr/local/etc/redis/redis.conf" ]
 ---> Running in 10ff267f06fe
Removing intermediate container 10ff267f06fe
 ---> 121c360ccfa8
Successfully built 121c360ccfa8
Successfully tagged redis:v999查看镜像
通过docker images查看静静构建好的镜像
[root@zhangshun dockerfile]# docker images
REPOSITORY        TAG       IMAGE ID       CREATED         SIZE
redis v999 121c360ccfa8 5 minutes ago 105MBDockerfile中 FROM 和 RUN 指令的作用
FROM:定制的镜像都是基于 FROM 的镜像,这里的 nginx 就是定制需要的基础镜像。后续的操作都是基于 nginx。
RUN:用于执行后面跟着的命令行命令。有以下俩种格式:
shell 格式:
RUN <命令行命令>
# <命令行命令> 等同于,在终端操作的 shell 命令。exec 格式:
RUN ["可执行文件", "参数1", "参数2"]
# 例如:
# RUN ["./test.php", "dev", "offline"] 等价于 RUN ./test.php dev offline注意:Dockerfile 的指令每执行一次都会在 docker 上新建一层。所以过多无意义的层,会造成镜像膨胀过大。可以使用&&管道例如:
FROM centos
RUN yum install wget
RUN wget -O redis.tar.gz "http://download.redis.io/releases/redis-5.0.3.tar.gz"
RUN tar -xvf redis.tar.gz

以上执行会创建 3 层镜像。可简化为以下格式:
FROM centos
RUN yum install wget \
    && wget -O redis.tar.gz "http://download.redis.io/releases/redis-5.0.3.tar.gz" \
&& tar -xvf redis.tar.gz如上,以 && 符号连接命令,这样执行后,只会创建 1 层镜像。
6. 将镜像推送到仓库
6.1 推送到Docker Hub
1.申请Docker hub账号
首先在https://hub.docker.com/官网申请一个docker hub 帐号,该账号是免费申请的。
但是在中国大陆访问dockerhub官方网站的时候,sign up注册按钮是灰色的,不能点击进行注册。以下提供一种解决方案:
在以下链接下载
链接:https://pan.baidu.com/s/1qG0fZTZ2-ntoC1HRhQHpuQ 密码:rzyn
下载谷歌访问助手之后,解压之后使用浏览器打开,根据提示添加即可。


再次访问docker hub网站申请账号,输入用户名,密码,邮箱地址,验证成功后进入邮箱激活即可。

2.创建个人仓库
创建账号成功之后登录docker hub,点击create按钮:create ->create repository ,起一个名字,这里我们最终创建的仓库名称:hello-docker,其中cupidkai是帐号名称,hello-docker是其中一个仓库名,如下图所示:

3.给镜像打标签
修改标签:docker tag IMAGEID(镜像id) REPOSITORY:TAG(仓库:标签)

(注:上面是给镜像修改tag,下面是给镜像打上标签之后才能对镜像进行push)
给镜像打tag 标签:
docker tag <existing-image> <hub-user>/<repo-name>[:<tag>] #tag不指定默认为latest
hub-user是docker hub的账户名
repo-name就是第一步创建时候的仓库名称

给镜像打上标签之后才能push
4. push镜像
登录docker hub账号
使用第一步创建的账号,在本地登录
docker push <hub-user>/<repo-name>:<tag>

Push成功之后,可登录到dockerhub网站,查看一下刚才创建的仓库名称

或者,使用docker search命令查找。

至此镜像就上传到了docker hub中,可以被任何用户进行拉取。
6.2 推送到阿里云CR仓库
登录阿里云容器和镜像服务控制台https://cr.console.aliyun.com/cn-hangzhou/instance/dashboard 需要注册阿里云账号

输入命名空间

输入仓库名称

选择仓库类型为【本地仓库】并创建镜像

创建成功后如下图所示

点击仓库名称查看仓库详情

后面需要在本地宿主机登录阿里云镜像仓库以及打标,推送如上图所示,此处跟Docker Hub的操作基本一致。可参考阿里云操作指南.
docker login --username=31464****@qq.com registry.cn-hangzhou.aliyuncs.com
docker tag [ImageId] registry.cn-hangzhou.aliyuncs.com/jsdocker-test/docker-test:[镜像版本号]
docker push registry.cn-hangzhou.aliyuncs.com/jsdocker-test/docker-test:[镜像版本号]
推送成功后可以在阿里云控制台看到如下信息,可供后续拉取使用

7.Docker 命令大全
容器生命周期管理
容器操作
容器rootfs命令
镜像仓库
本地镜像管理
info|version
