
Spring Security快速入门
官方文档:
https://docs.spring.io/spring-security/reference/index.html
功能:
- 身份认证(authentication)
- 授权(authorization)
- 防御常见攻击(protection against common attacks)
身份认证:
- 身份认证是验证
谁正在访问系统资源,判断用户是否为合法用户。认证用户的常见方式是要求用户输入用户名和密码。
授权:
- 用户进行身份认证后,系统会控制
谁能访问哪些资源,这个过程叫做授权。用户无法访问没有权限的资源。
防御常见攻击:
- CSRF
- HTTP Headers
- HTTP Requests
1、身份认证(authentication)
官方代码示例:GitHub - spring-projects/spring-security-samples
1.1、创建Spring Boot项目
项目名:security-demo
JDK:17
SpringBoot:3.2.0(依赖了Spring Security 6.2.0)
Dependencies:Spring Web、Spring Security、Thymeleaf
1.2、创建IndexController
package com.neuedu.securitydemo.controller;

@Controller
public class IndexController {

    @GetMapping("/")
    public String index() {
        return "index";
    }
}1.3、创建index.html
在路径resources/templates中创建index.html
<html xmlns:th="https://www.thymeleaf.org">
<head>
  <title>Hello Security!</title>
</head>
<body>
<h1>Hello Security</h1>
<!--通过使用@{/logout},Thymeleaf将自动处理生成正确的URL,以适应当前的上下文路径。
这样,无论应用程序部署在哪个上下文路径下,生成的URL都能正确地指向注销功能。-->
<a th:href="@{/logout}">Log Out</a>
</body>
</html>1.4、启动项目测试Controller
浏览器中访问:http://localhost:8080/
**浏览器自动跳转到登录页面:**http://localhost:8080/login

输入用户名:user
输入密码:在控制台的启动日志中查找初始的默认密码
点击"Sign in"进行登录,浏览器就跳转到了index页面
1.5、注意事项
1.5.1、@{/logout}的作用
通过使用@{/logout},Thymeleaf将自动处理生成正确的URL,以适应当前的上下文路径。这样,无论应用程序部署在哪个上下文路径下,生成的URL都能正确地指向注销功能。
例如:如果我们在配置文件中添加如下内容
server.servlet.context-path=/demo那么@{/logout}可以自动处理url为正确的相对路径
但是如果是普通的/logout,路径就会不正确
1.5.2、页面样式无法加载的问题
页面样式bootstrap.min.css是一个CDN地址,需要通过科学上网的方式访问

否则你的登录页会加载很久,并且看到的页面是这样的(登录按钮没有样式文件渲染,但是不影响登录功能的执行)

1.6、Spring Security默认做了什么
- 保护应用程序URL,要求对应用程序的任何交互进行身份验证。
- 程序启动时生成一个默认用户“user”。
- 生成一个默认的随机密码,并将此密码记录在控制台上。
- 生成默认的登录表单和注销页面。
- 提供基于表单的登录和注销流程。
- 对于Web请求,重定向到登录页面;
- 对于服务请求,返回401未经授权。
- 处理跨站请求伪造(CSRF)攻击。
- 处理会话劫持攻击。
- 写入Strict-Transport-Security以确保HTTPS。
- 写入X-Content-Type-Options以处理嗅探攻击。
- 写入Cache Control头来保护经过身份验证的资源。
- 写入X-Frame-Options以处理点击劫持攻击。
2、Spring Security 的底层原理
官方文档:Spring Security的底层原理
Spring Security之所以默认帮助我们做了那么多事情,它的底层原理是传统的Servlet过滤器
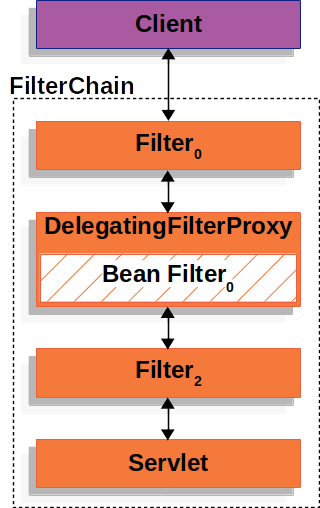
2.1、Filter
下图展示了处理一个Http请求时,过滤器和Servlet的工作流程:

因此我们可以在过滤器中对请求进行修改或增强。
2.2、DelegatingFilterProxy
DelegatingFilterProxy 是 Spring Security 提供的一个 Filter 实现,可以在 Servlet 容器和 Spring 容器之间建立桥梁。通过使用 DelegatingFilterProxy,这样就可以将Servlet容器中的 Filter 实例放在 Spring 容器中管理。
2.3、FilterChainProxy
复杂的业务中不可能只有一个过滤器。因此FilterChainProxy是Spring Security提供的一个特殊的Filter,它允许通过SecurityFilterChain将过滤器的工作委托给多个Bean Filter实例。
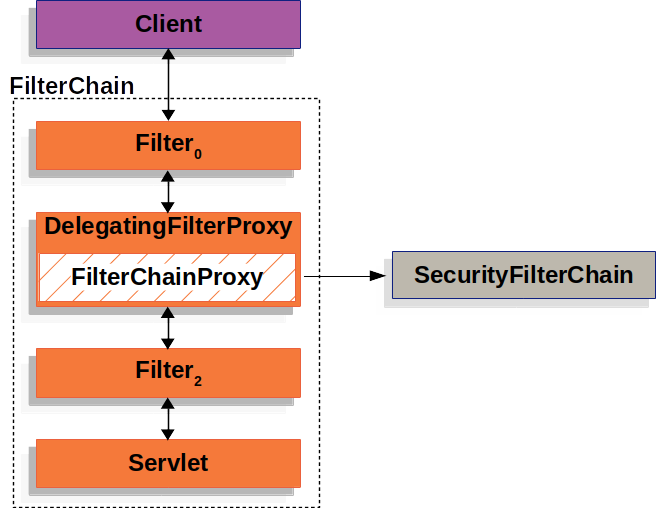
2.4、SecurityFilterChain
SecurityFilterChain 被 FilterChainProxy 使用,负责查找当前的请求需要执行的Security Filter列表。
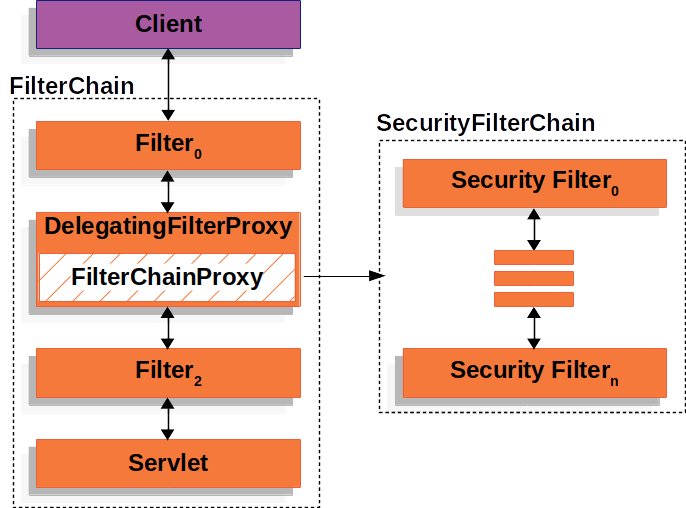
2.5、Multiple SecurityFilterChain
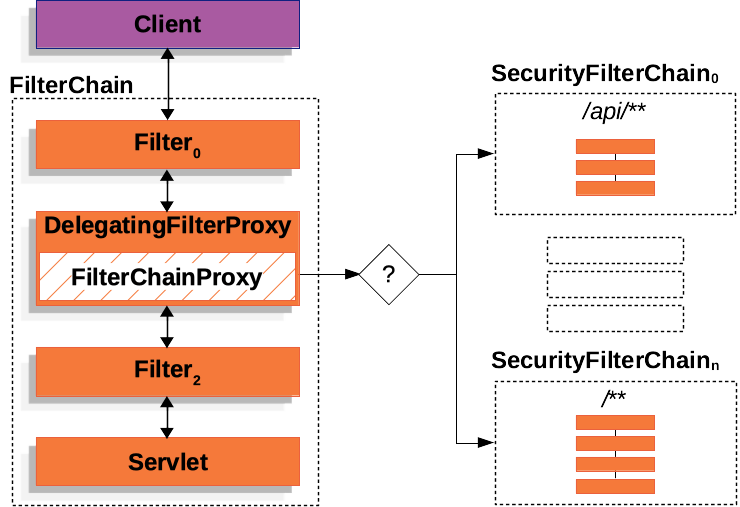
可以有多个SecurityFilterChain的配置,FilterChainProxy决定使用哪个SecurityFilterChain。如果请求的URL是/api/messages/,它首先匹配SecurityFilterChain0的模式/api/**,因此只调用SecurityFilterChain 0。假设没有其他SecurityFilterChain实例匹配,那么将调用SecurityFilterChain n。
3、程序的启动和运行
3.1、DefaultSecurityFilterChain
SecurityFilterChain接口的实现,加载了默认的16个Filter

3.2、SecurityProperties
默认情况下Spring Security将初始的用户名和密码存在了SecurityProperties类中。这个类中有一个静态内部类User,配置了默认的用户名(name = "user")和密码(password = uuid)

我们也可以将用户名、密码配置在SpringBoot的配置文件中:在application.properties中配置自定义用户名和密码
spring.security.user.name=user
spring.security.user.password=123